This might make a great project for a Scout or for a high school senior project.
Click on a picture for a larger image
|
|
 |
 |
|
 |
 |
 |
|
 |
 |
 |
 |
 |
 |
 |
|
|
 |
 |
 |
|
|
 |
 |
 |
 |
|
 |
 |
 |
 |

|
|
 |
 |
|
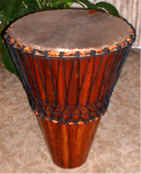
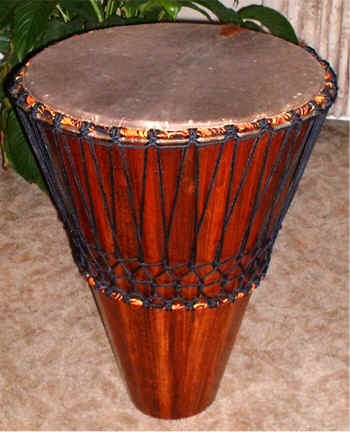
The ashiko drum comes from African origins. Some say that it has its origin among the drum makers of Nigeria. Originally, djembe drums were carved out of a single log. According to some sources, as logs became scarce the carvers began to make drums from boards using stave construction. Others say that the ashiko came not out of a scarcity of drum-building materials, instead the ashiko is another example of African creativity and acoustic design. Someone else can sort this out. I wanted to try my hand at making a large version of the ashiko, using wooden staves cut to form the drum's body.
To start building my ashiko drum I looked for a source of suitable wood. I found a few free, discarded church pews made out of mahogany. The price was in my budget and I was very excited to find a source for mahogany. I took the ends off, cut the pew into manageable pieces and removed the curved face of the pieces with a powered planner. All the pieces were cut to the same squared dimensions. I had enough stock for 15 staves. The advantage of using the wood from old pews was that the moisture content was extremely low. Also this old, stable wood would no longer warp or crack due to drying out.
The acoustics principles of how a drum produces sound can be very detailed. But one basic idea is that the wood used for a drum will color the sound the drum produces. Maple, birch, beech, oak and mahogany are frequently used for the shells of drum kits. Each wood produces its own sound quality. It is generally known that mahogany produces a lower, more mellow tone. Hardwoods are preferable for drum bodies because of their stability and strength. However, pine or cedar can be used to make an ashiko, even scrap pallet wood could be used to make a drum. But these woods will not produce the same quality of sound as a hardwood.
I used a free web program called "The Drum Calculator" (Link here) to calculate the size of the staves based on the size of the top and bottom of the drum I wanted to make. Most ashiko drums have a head approximately 12-14 inches across and are 24 -26 inches tall. Some are larger. For personal reasons, I wanted a big drum with a playing area of 20 inches.
The "Drum Calculator" gave these results for the drum I was building:
Top Diameter 20"
Bottom Diameter 10"
Stave Length 28"
Number of Staves 15
Top of Stave Width 4.2511"
Bottom Stave Width 2.1255"
Internal Angles 12 degrees
Since I am using mahogany and this drum will have large dimensions, I expect its tone will be deep and mellow. I am hoping that it will also have some nice mid-range overtones. Maybe this drum will fit the description of a "Thunder Drum", one that is felt in the chest, as well as heard with the ears.
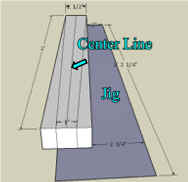
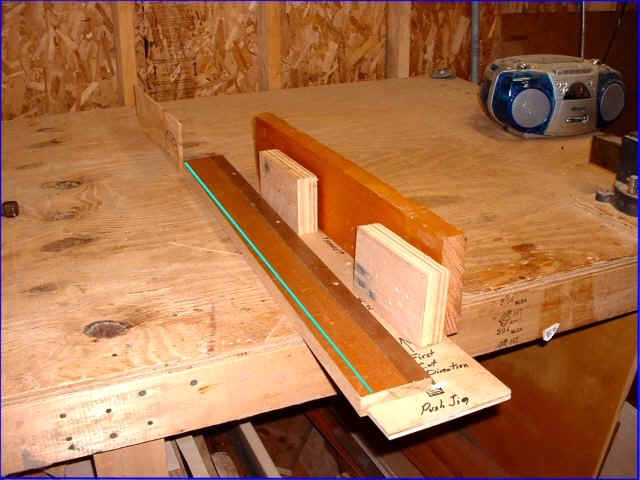
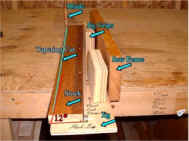
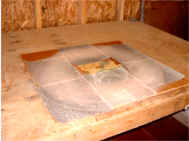
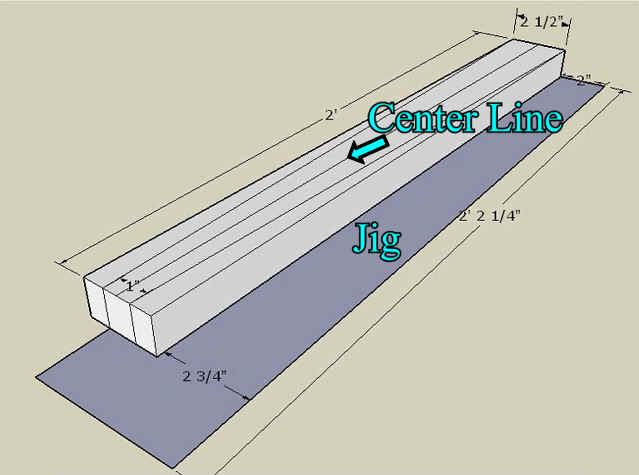
After securing and preparing the wood for this project, I built a jig for cutting a tapering bevel into both sides of each stave. In the example that follows, the illustration shows different dimensions for the purpose of simplicity. Using this example, the jig will yield a tapered stave that is 2 1/2 " wide at the top and 1" wide at the bottom. This will result in a drum with a 12" diameter head, and a 4 3/4" diameter mouth if there are 15 staves and each one is cut to form a 12 degree bevel. These dimensions can be used to make a very nice medium sized drum.

I made my jig out of a piece of 1/2" plywood that was square at each corner. Next I laid out a center line on a piece of stock that was previously squared and true. I divided the final width of the top and bottom in half and placed half of these dimensions on either side of the centerline. In this example, 1/2" l was placed on either side of the center line at the bottom of the stock for the 1" layout. I drew a line from these marks to the dimensions at the top of the stock. These lines show the taper cut I need to make.
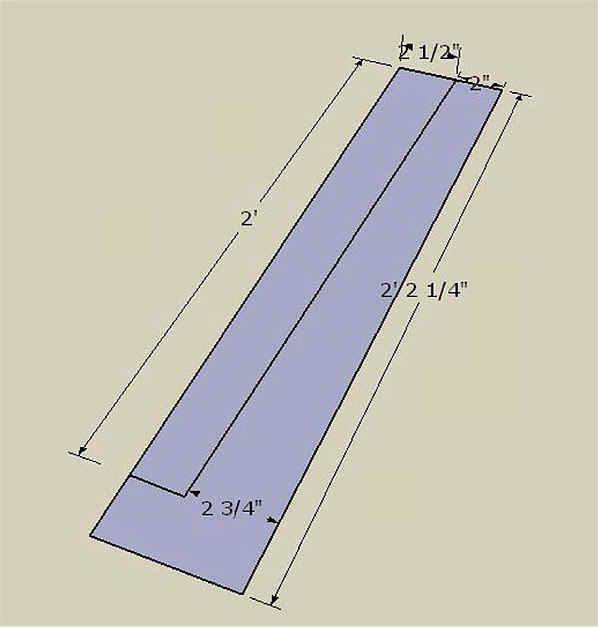
Then I matched the outside edge of the top of the stock with the top edge of the jig. Next I carefully moved the bottom of the stock piece to the left until the line of the taper cut matched the edge of the jig. At this point, the line of the outside (left) taper cut is parallel with the right side of the jig. I clamped the two pieces together and scribed a line along the length and end of the stock to the surface of the jig.
This is the result...
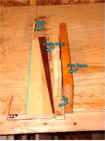
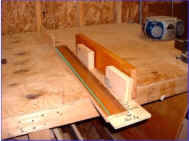
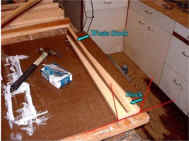
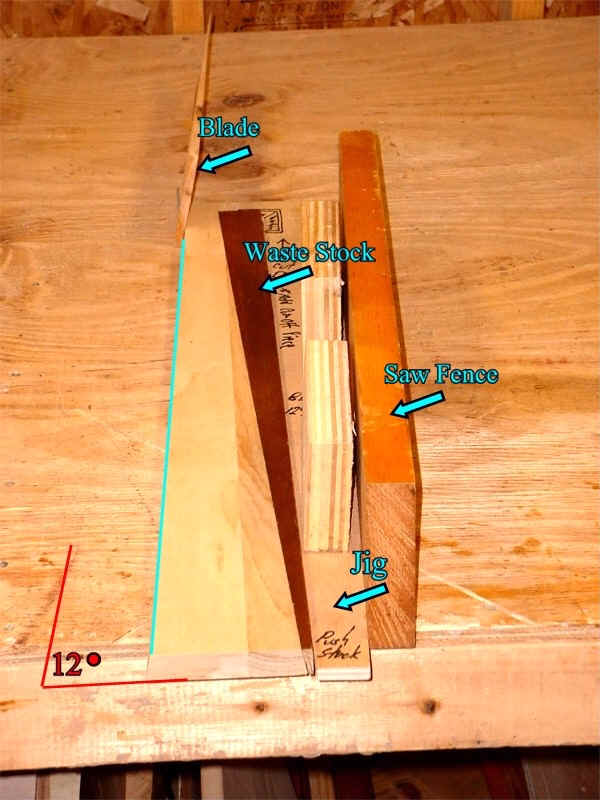
I used a skill saw to cut the shape of the stock away from the jig. I added block handles, fastened with screws. To use this jig to make the taper cut I had laid out, I placed the right side of the jig against the table saw fence. Then I adjusted the fence so the layout line for the taper lined up with the cutting edge of the table saw blade. I also set the table saw blade for the correct bevel cut, in this case 12 degrees.

Compound cuts, making a taper and a bevel at the same time, can be complex. So before I used this setup on my table saw, I laid out a mock-up on my bench. This helped me to think through exactly how I would use the jig to achieve the proper compound cuts. This picture illustrates the set up for the first cut of the stock. The jig allowed me to make a compound cut in one pass that resulted in a bevel angle of 12 degrees on the face of the side as well as a taper to the side of the stock. Here is how I arrived at the bevel angle: 15 staves x 2 sides each, yields 30 faces. 360 degrees divided by 30, yields 12 degrees as the bevel cut on each face that will be joined together.

The jig grips were fasted with small screws, the screw heads were counter sunk on the bottom of the jig so they would not catch or scratch the face of the saw table. Here is another picture of how I used the jig for the first cut.
The picture below shows the setup for the second compound cut. I used the same jig, but this time I flipped it over, so the jig's stop was presented to the blade first. I also included a piece of waste stock from the first compound cut. This waste stock was placed in the jig with the square side of the waste stock placed against the fence-side of the jig. The stave was positioned with the first bevel cut matching the same cut in the waste stock. I kept the blade at the same 12 degree bevel.
For this second cut, I carefully pushed the stock/waste/ jig as a unit along the fence and into the blade. This resulted in the a matching tapering bevel cut. Note that the two beveled faces are not parallel in a cross section. Instead the cross section of the stave is a trapezoid.
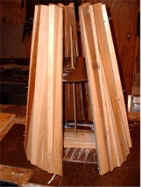
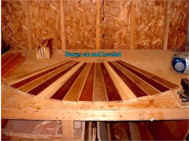
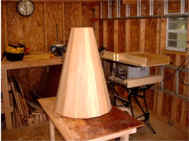
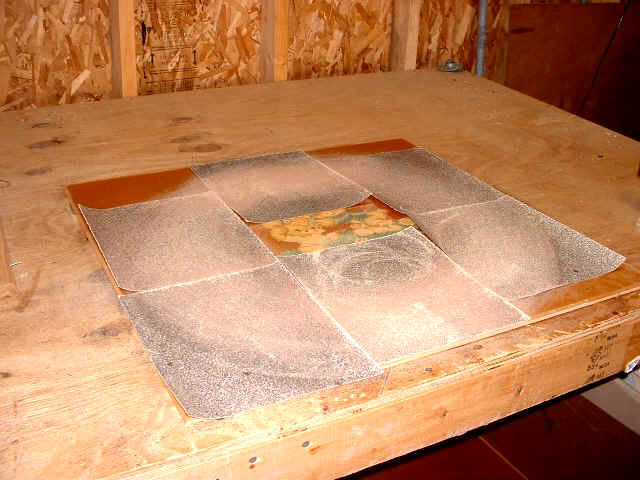
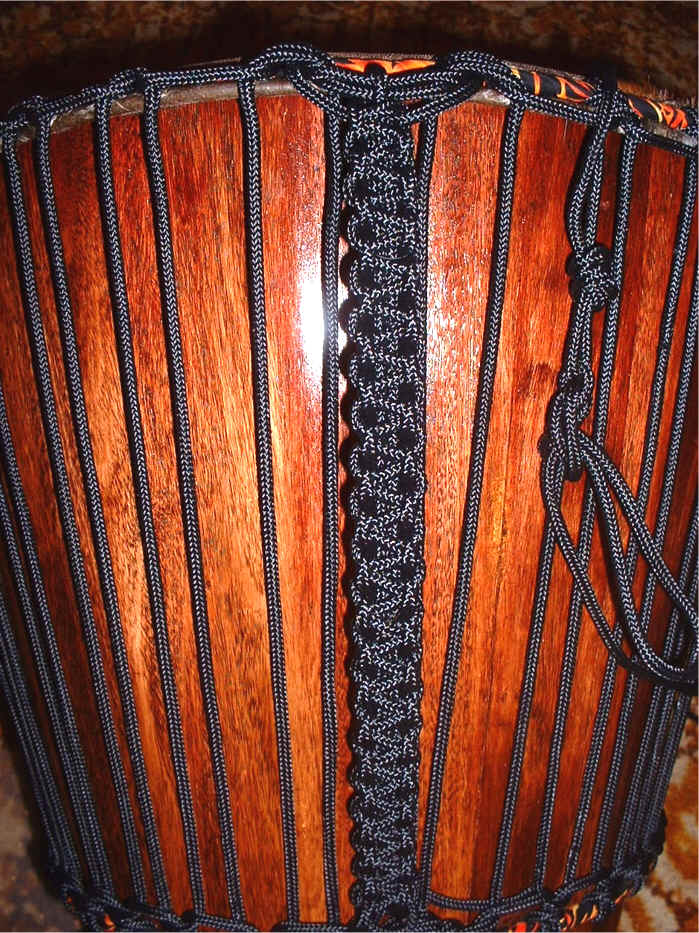
Here are the 15 staves. The old church pews had a rainbow of finishes and aged color.
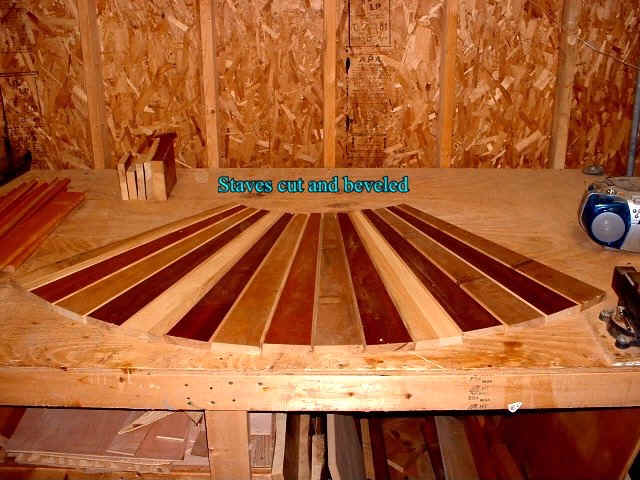
I used the waste stock as a temporary stand-off for the cinch straps used in clamping. I tacked each waste piece to the outside surface of each stave with finishing nails. The red lines at the bottom of the stave indicate the bevels on the side faces. Connecting these faces together formed the cone-shape needed for an ashiko.

Next I made an assembly stand with a dowel rod and a sliding disk. This stand was inside the drum as I assembled the staves.
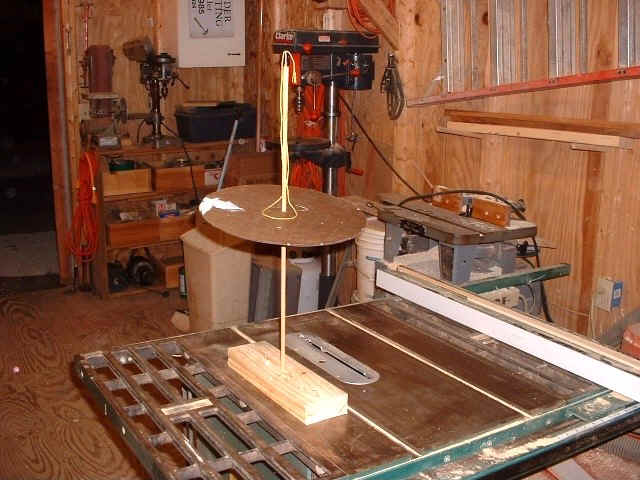
I applied wood glue with a tooth brush to the face of each beveled side and carefully propped each stave against the stand.
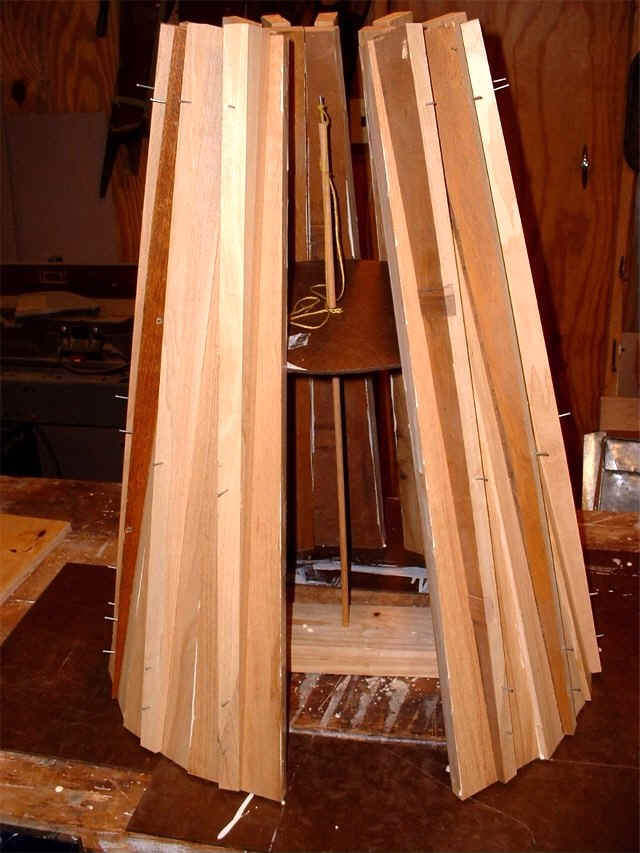
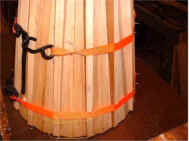
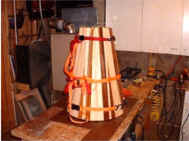
Next I carefully placed utility cinch straps around the staves. The finishing nails kept the straps from slipping up the cone and the waste stock kept the straps out of the glue. When the staves were all touching, I reached inside and released the string on the assembly stand so the temporary prop-disk would drop to the bottom.

Very slowly I increased the tension of the straps. As I did this, I kept adjusting the beveled edges so the faces lined up properly. I started with the bottom cinch and worked my way to the top. I took my time and tightened the staves in stages.
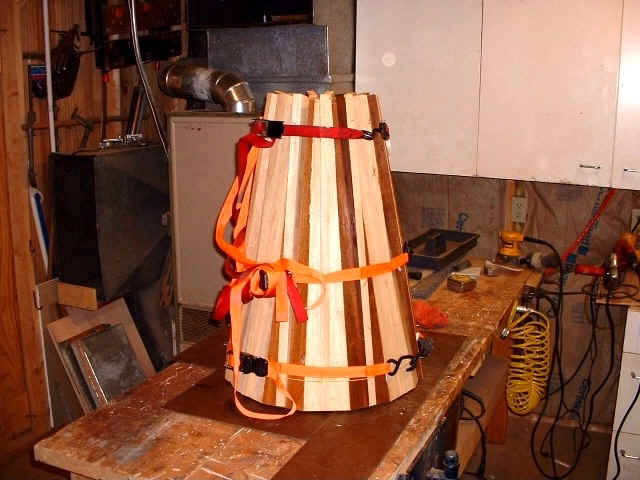
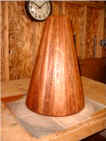
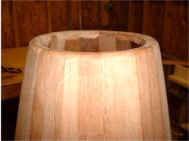
Then I let the assembly dry for 24 hours. After it was dry, I removed the straps and lifted off the waste stock. Here is the first look.

I used a metal cabinet scraper to remove the bumps of dried glue. Then I used a belt sander with #80 coarse grit paper to sand down the sharp edges where the staves came together. Finally, I used a file to shape the bottom of the drum to a rough shape.
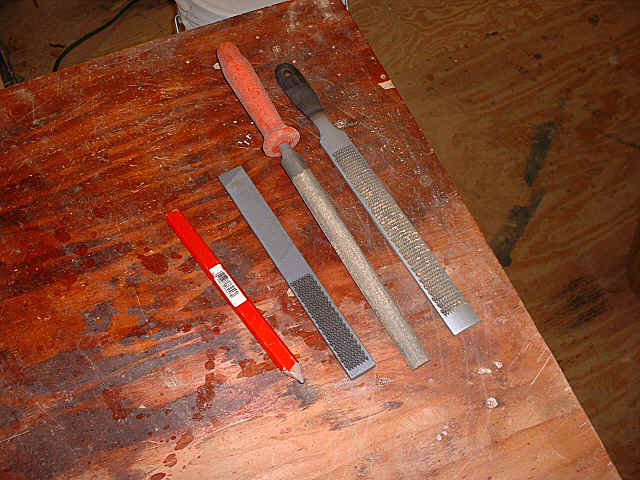
Here are some of the hand files I used to shape the bottom and top of the drum. They include a flat file, a flat rasp, a cured file and a curve-faced rasp. The rasp removes a lot of wood in very little time, but it leaves a rough surface.
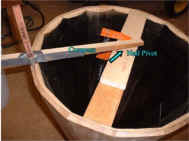
I clamped two pieces of scrap together so the assembly would fit snuggly in the drum head opening. Next I measured the maximum diameter of the drum from one outside edge to the opposite side. Then I marked this diameter line onto the scrap brace. I did this several times from different sides of the drum. Judging by these random marks I could see where the center of the diameter was. I marked this spot and verified it again with measurements.
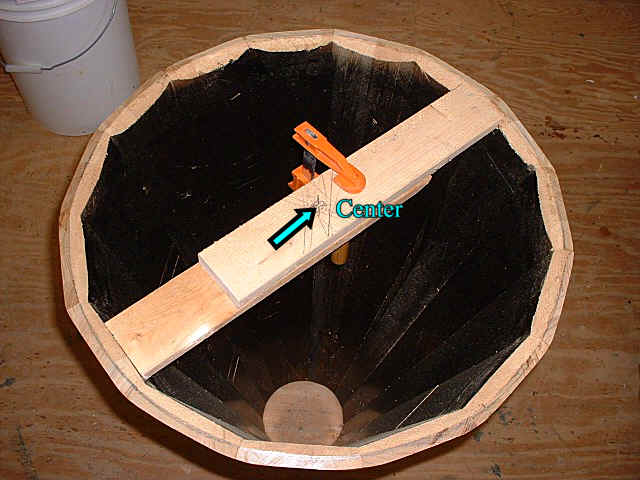
Next I made a crude compass out of scrap wood. A nail at one end of the scrap served as a pivot point. I taped a pencil to the arm of the compass at a location where the pencil would circumscribe a line in the middle of the end of each stave. Then I put the pivot in the center of the brace and traced the line.
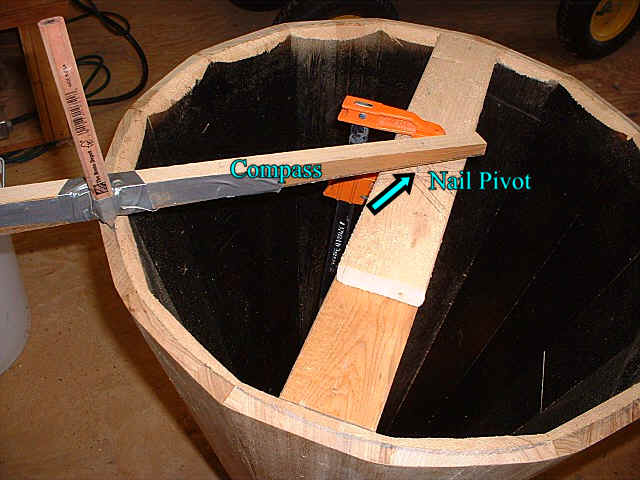
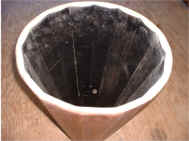
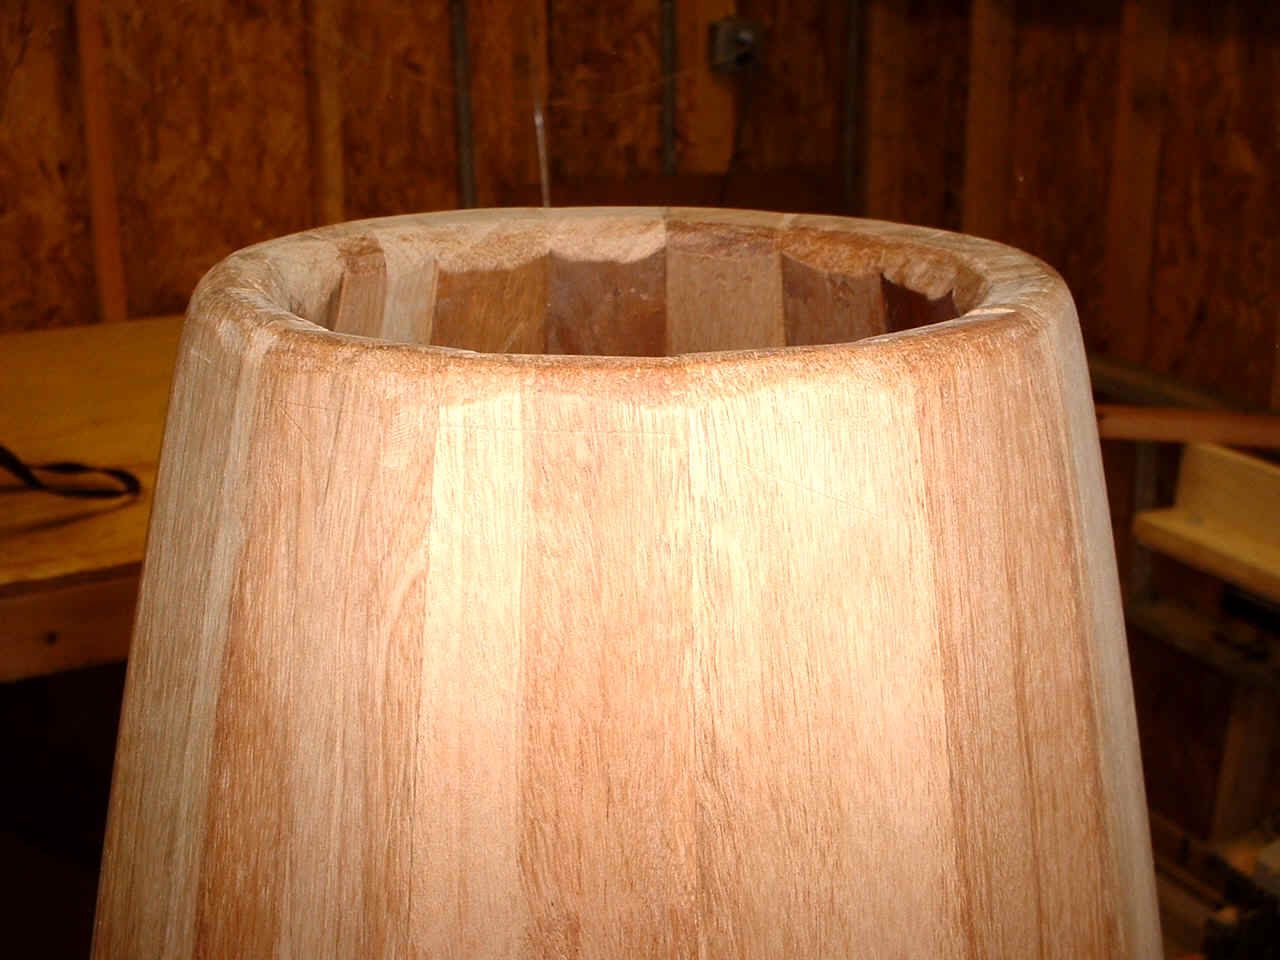
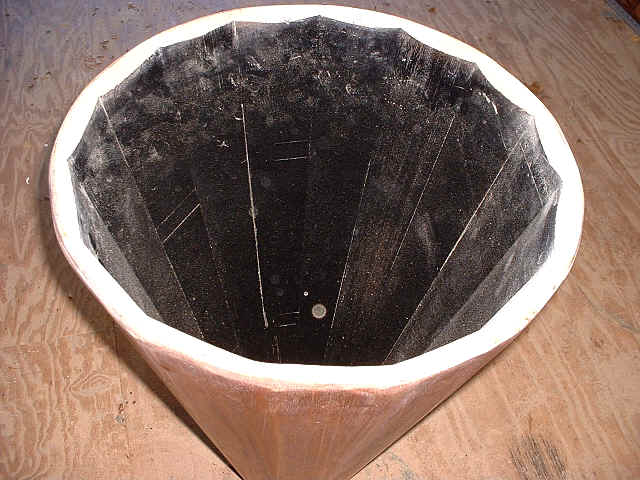
I used this line as a guide to create the bearing edge for the drumhead skin. Using the rasp, I filed away the inside edge of each stave at a 45 degree angle. I kept the angle of the rasp the same, and stopped at the pencil line as I filed around the inside edge of the drum. This resulted in the beginning of a serviceable bearing edge. The scalloped edge inside the drum resulted from creating a true circle on the flat segments of the staves.
Before I filed this edge, I spray painted the inside of the drum black with acrylic paint to give the inside a quick uniform surface. A better alternative would have been to put the same kind of finish on the inside as on the outside, so the drum surfaces would react to the environment at the same rate.
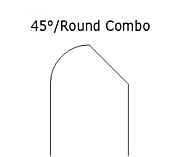
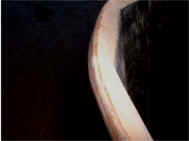
To make the outside of the bearing edge, I used a wood rasp and a belt sander to create a surface that has a quarter round profile. A router could be used. The next illustration shows a profile of the bearing edge I created:

Djembe drums, which are traditionally carved from a single log, often use a bearing edge profile that resembles a view of your thumb. This is a very comfortable bearing edge to play, and many find it preferable for hand drums. But it was hard to create the interior radius of this profile on the flat staves inside my ashiko. I compromised by using the round combo profile shown above.
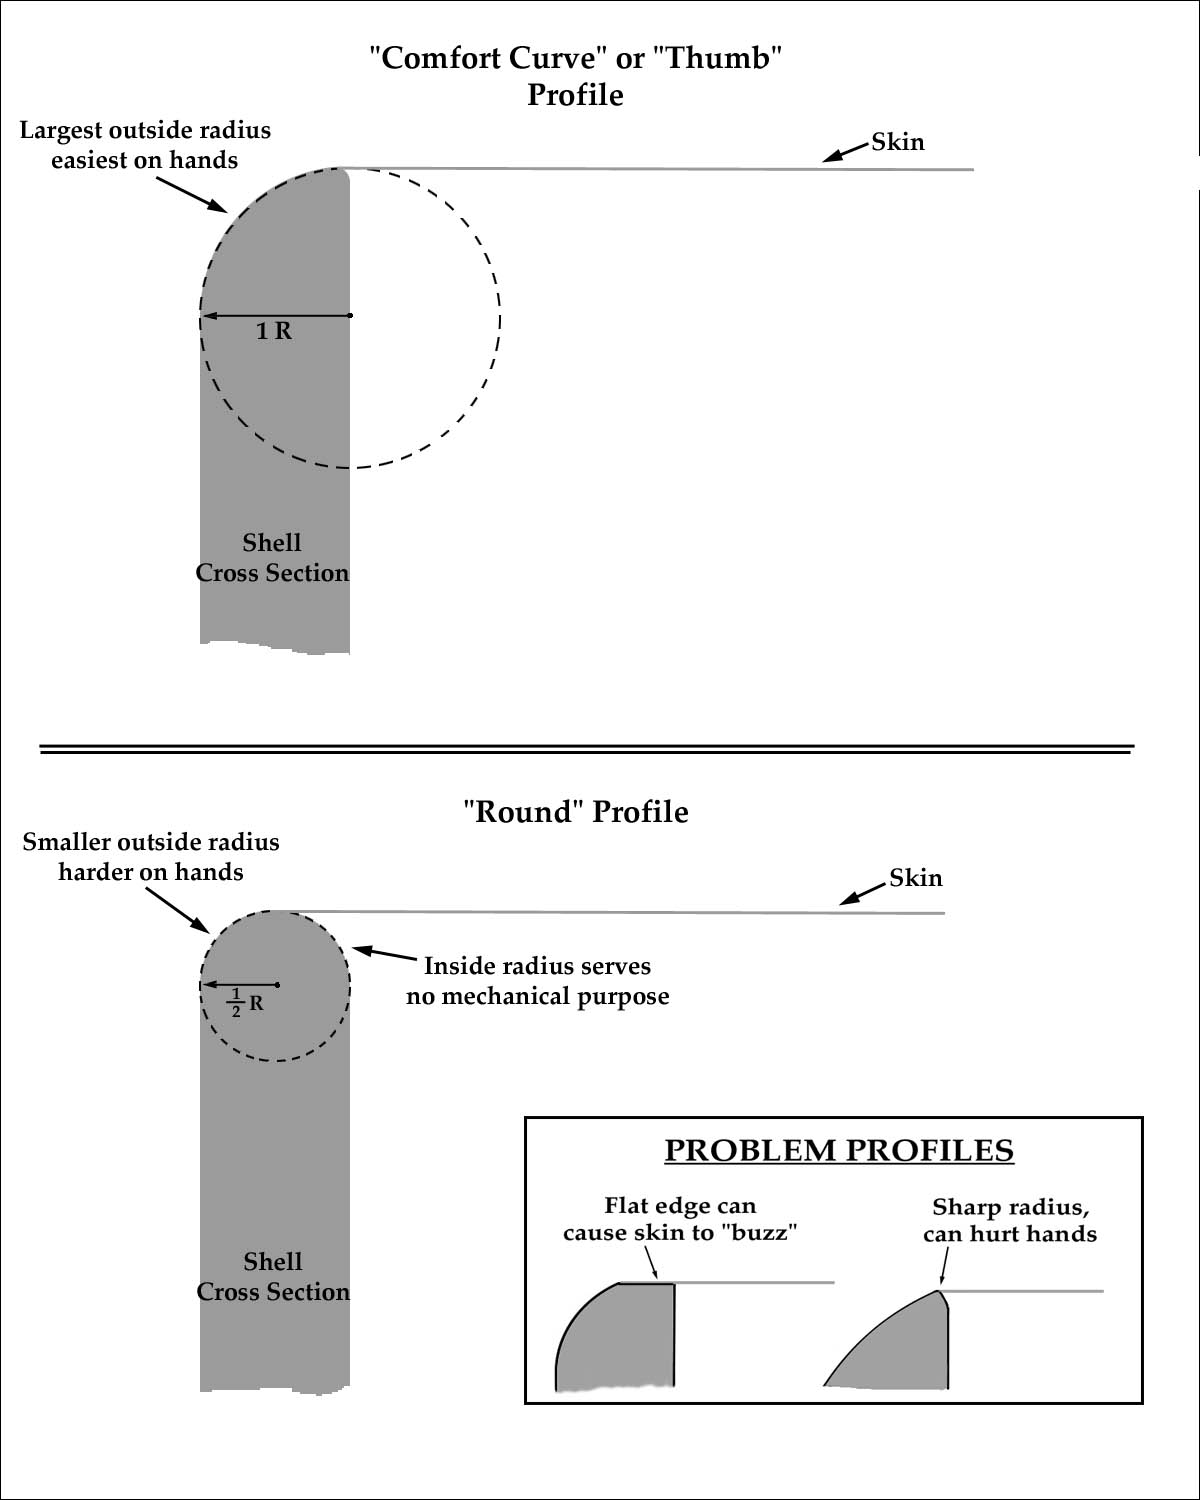
When carving the bearing edge, I wanted to avoid the problem profiles shown above.
Next, I sprayed adhesive on the back of coarse sandpaper to glue it to a large flat surface. Then I turned the drum upside down onto this sanding surface. By moving the entire drum shell around in a circular motion I was able to remove all variations in the bearing edge and to create a true, flat plane on the bearing edge.
This photo shows the way I held the drum to sand the bearing edge to a true plane. It also shows how the drum looked after the first application of stain.

This is a close up of the bearing edge. You can see the slope on the inside of the profile, the 1/8" flat surface of the bearing edge, and the rounded profile on the outside. After this shot, I used fine sandpaper to finish these surfaces with a very light touch.

Time for a second staining.

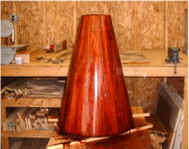
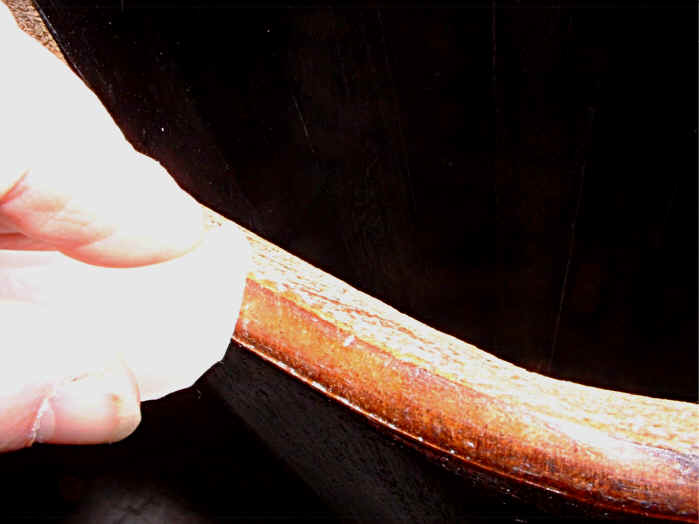
I used Tung oil as a finish by applying several light coats. Polyurethane could be used. I allowed the coats to completely dry and lightly sanded the drum between coats. I completed all the staining and finishing of the drum shell before going on to tensioning the drum skin with a rope system that uses three steel rings.
While the finish coats of the drum were drying, I went to a neighbor who is a professional welder and had him fabricate the three drum rings. He used 3/16" cold rolled steel and a TIG welder. The bottom one was 42 " in circumference. This bottom ring (not shown) will become the base ring in the three-ring tuning system.

To determine the size of the two top rings, I turned my drum upside down and traced the circumference of the drum onto a piece of scrap plywood. I took this to the welder with instructions to make one ring with an additional 3/8" margin all the way around the line I had traced onto the wood. I also asked him to make the final ring slightly smaller than the second one.
These two top rings will become the crown ring and the flesh ring. Keep in mind that the crown and flesh ring both need to slip over the top of the drum.
I covered the base ring and the crown ring with a wrap of masking tape. The reason for this is that sometimes the rings on a drum can rust and cause the skin to fail or the ropes to discolor. Electrical tape, or friction tape could be used for the same purpose.
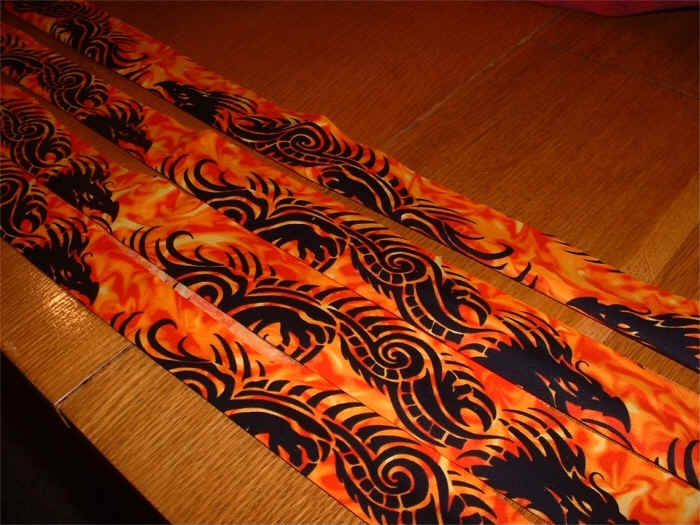
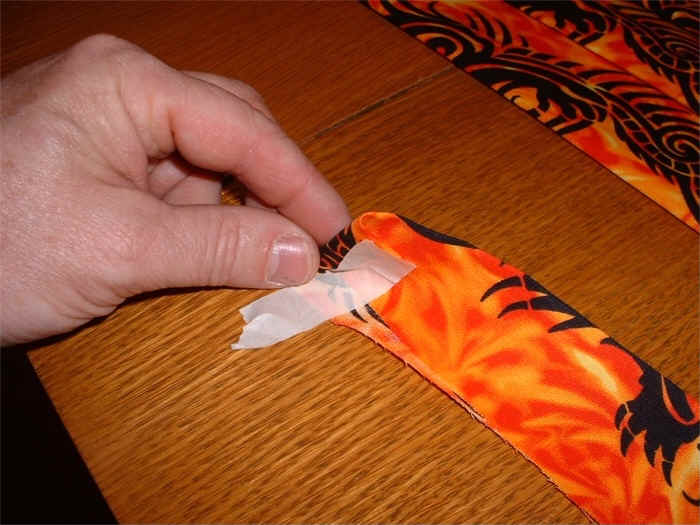
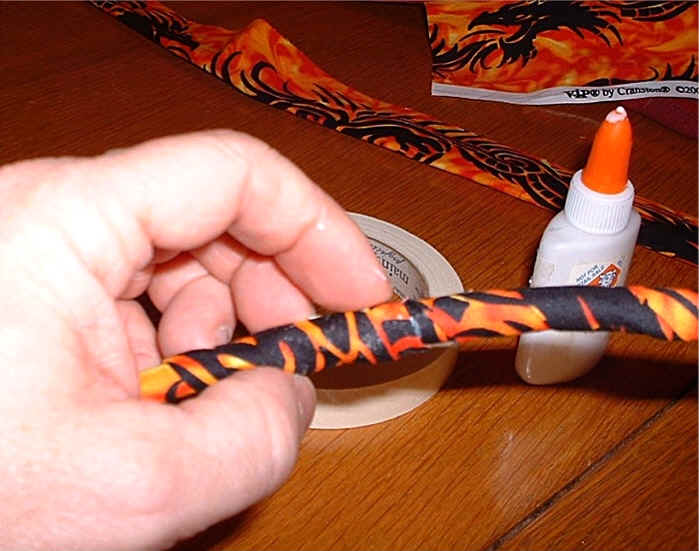
I laid out the fabric I purchased for the drum rings. Next I cut the fabric into strips. Some drum builders cut these strips on the bias.

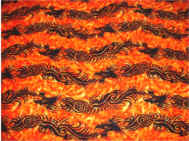
I chose this fabric because I thought it would look good against the mahogany wood when it was folded around the rings. The dragons really had nothing to do with my choice. I was attracted to the bright color and the contrasting black.
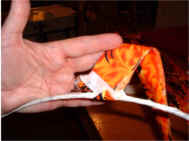
My next step was to fold the fabric strips in half. This created a finished edge. This folded edge is what will hide the cut edges and it will be the edge that shows after a ring is wrapped with the strips. To create an edge to start wrapping the fabric, I folded the end of one strip over and held it in place with tape. It sounds funny to say that I started with a "finished" edge, but that's what I did.
This shot shows how I placed this end on the ring to start wrapping the fabric. The finished edge of the strip is held by my fingers, the cut edges are toward the ring. Obviously the strip has to start at an angle.
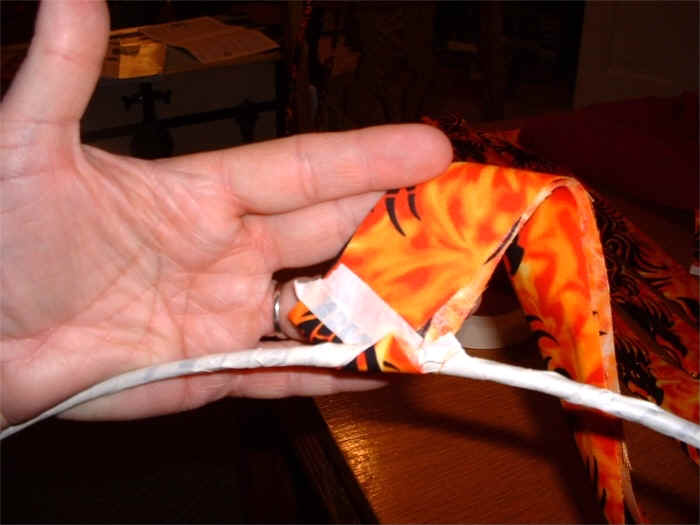
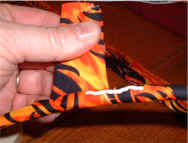
Once the fabric was anchored with a little tape I wrapped the fabric all the way around the drum, making sure the finished edge always covered the cut edges as I went along. I had to add additional strips as I wrapped the strip around the ring. I folded the start of a new strip over the tail end of the last strip and let the wrapping itself hold the strips tightly in place.
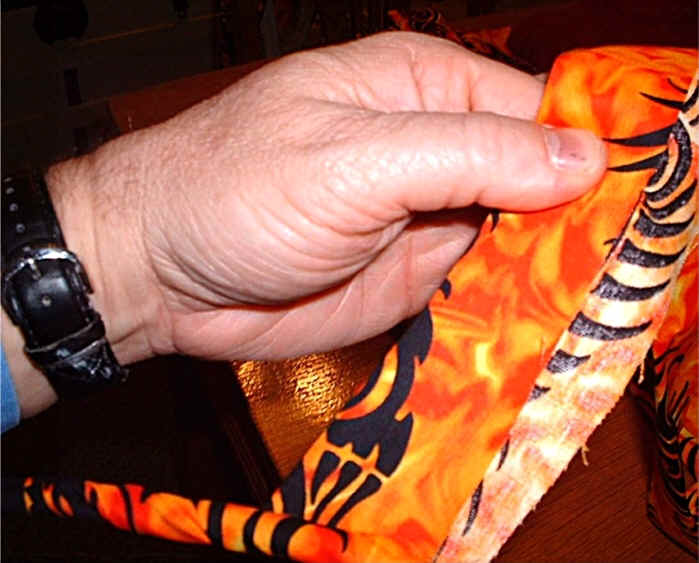
When I came back to the starting point, I folded all the exposed cut edges toward the inside of the fabric strip. I placed a small amount of white glue on the fabric and continued to wrap the end.
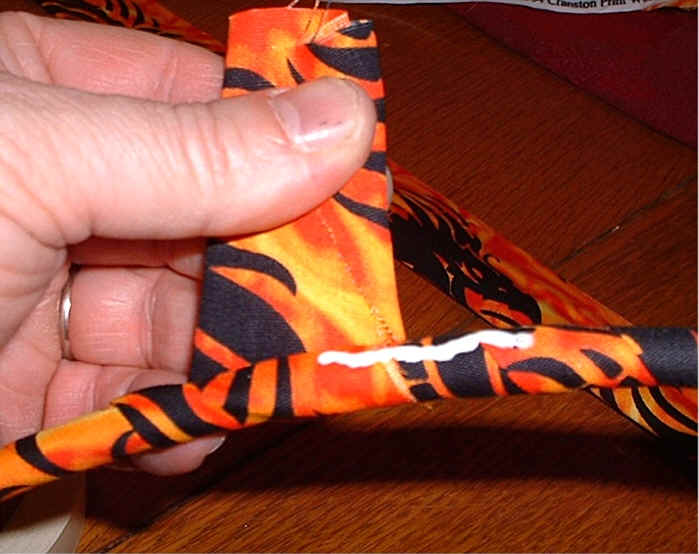
When I was finished, I held the end until the glue set in a minute or two.
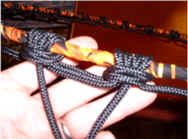
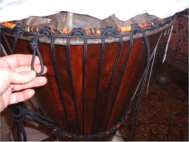
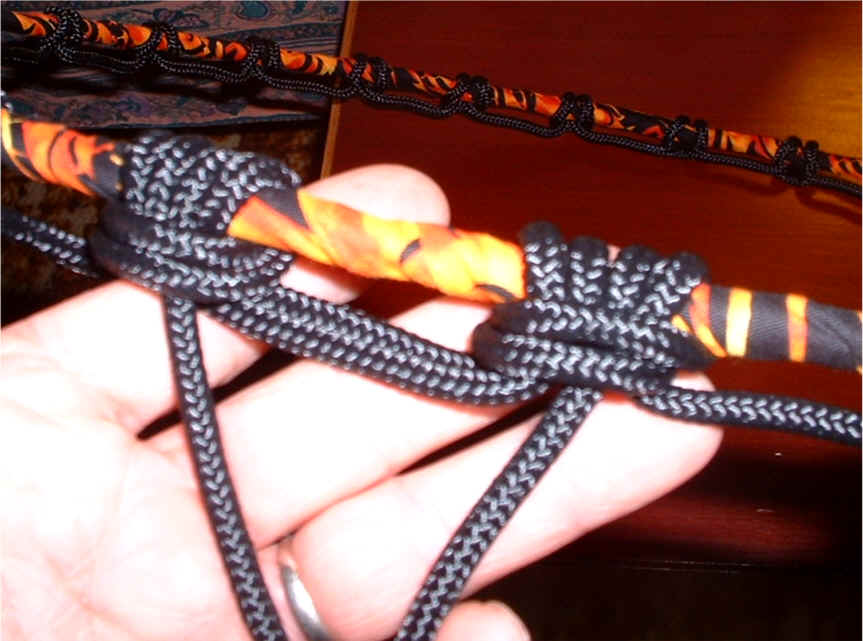
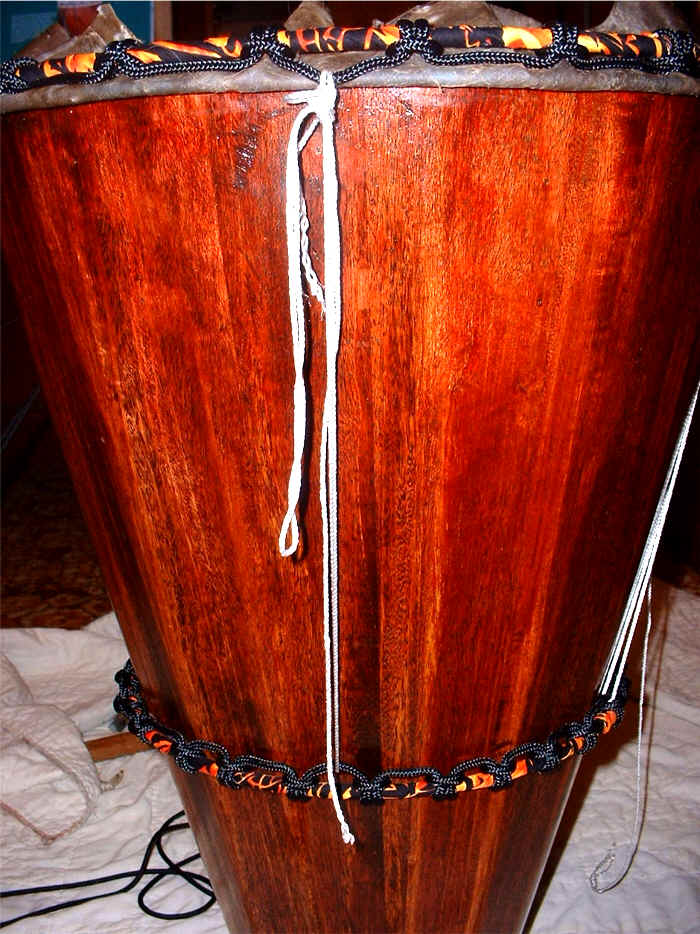
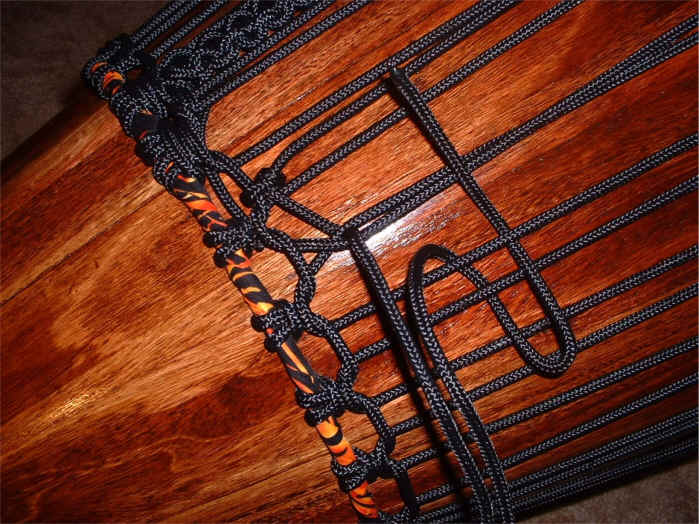
Following directions I found on the internet, I used 3/16 " Dacron (polyester) rope to prepare the crown ring and the base ring. Polyester rope is preferred because it does not stretch the way other ropes do. I tied 28 knots around each ring. This picture shows the final pair of self tightening knots where the two rope ends come together. It may look complicated, but all I did was feed the loose end from one knot back into the neighboring knot, following the path of that knot's rope. For example, the loose end of the knot on the right was fed back into the knot on the left, and the loose end of the knot on the left was fed back into the knot on the right. Then both knots were tightened.
This picture shows the ends of the rope after all the crown knots were made. These ends were about three feet long. The ends of the base ring were about two feet long. I used these ends later to make a handle for the drum.
On the crown ring, the knots were spaced three fingers apart. On the base ring they were only one finger apart. Five times the circumference of the ring was an ample measurement for the rope that is needed for the crown ring. Four times the circumference was ample for the base ring.
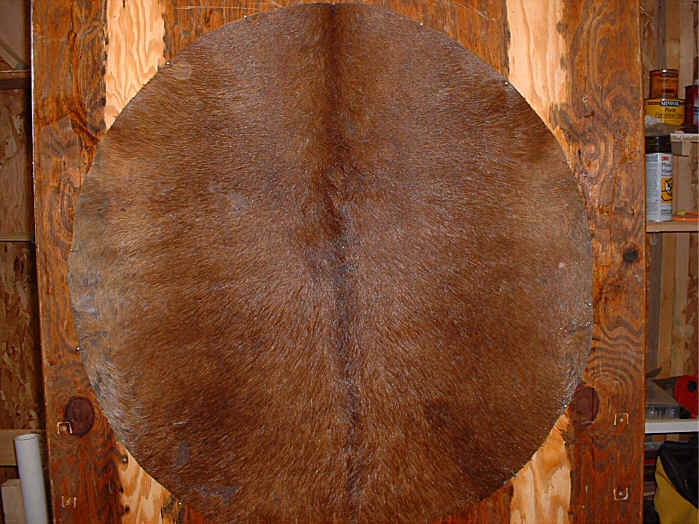
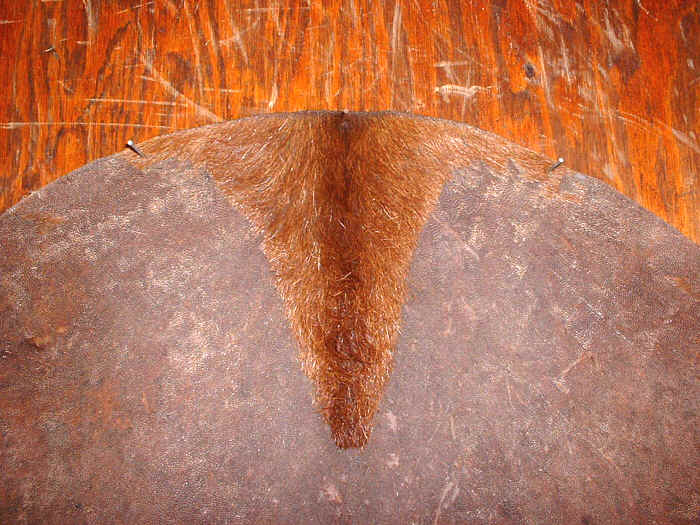
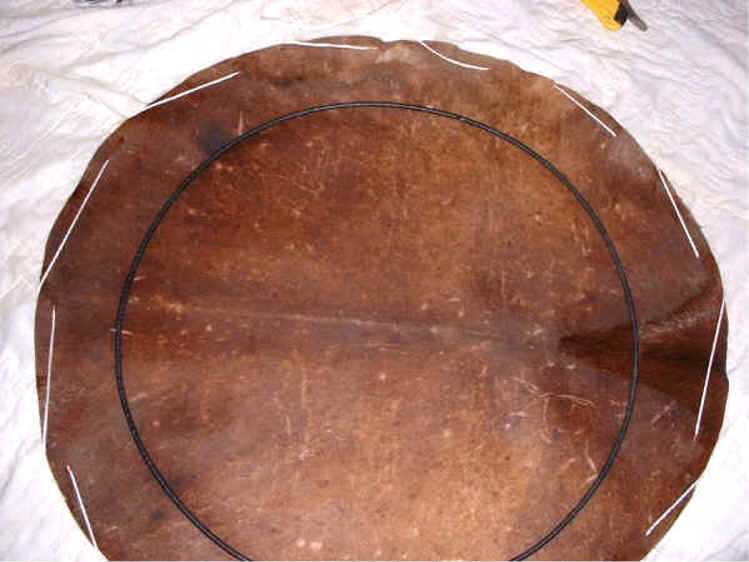
I ordered my drum rope and my goat hide from Rhythm Traders in Oregon. Once the hide arrived I laid the flesh ring on the hide and traced a circle three inches larger than the metal ring. This actually brought the outline of the circle to the edge of the hide. Using aviation snips (tin snips), I cut the hide into a circle by following this line. Next I washed the hide in the tub with hot water. With a scrub brush, I cleaned the hair side of the hide, removing dirt and soil particles. I had a shower attachment on this tub, so I sprayed the hide with clean water to rinse it. After draining the tub, I soaked the hide for an hour in clean hot water, then rinsed it again. This removed a lot of the animal smell from the hide. However, not all of it can be removed, it is after all the skin of a goat. In time, the smell will diminish significantly.
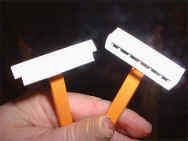
To shave the hide I used Bic single blade razors. I used pliers to snap the safety guard off the bottom of the razors. Be careful, you can see that I cut my thumb doing this. I prepared four razors ahead of time this way.

Next I used finish nails or "bright" brads and nailed the hide to a large piece of plywood. I tacked the hide with the neck at the top of the plywood and the tail of the hide toward the bottom. As I nailed the hide down I stretched out the wrinkles. Then I stood the plywood on end so the excess water could drain off the hide.
While the hide was still wet, I used the modified razors to shave the hair off the hide. I started near the neck (at the top) and worked down and toward the outside, following the natural direction of the hair pattern. I left the center of the hide (above the spine) for the last step because this is where the hide is toughest. I used smooth gentle strokes and found this to be an enjoyable task in an odd sort of way...
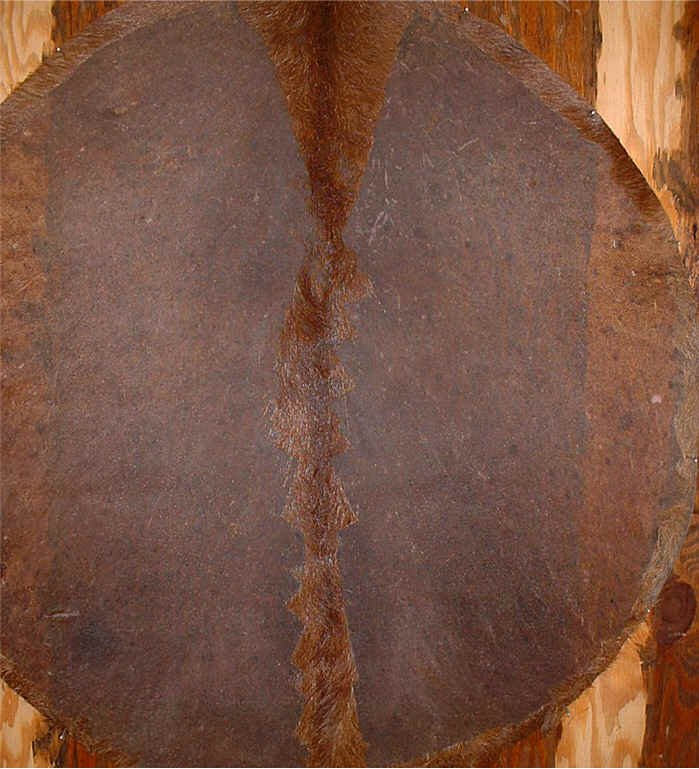
I shaved the left side first, then the right. Finally, I shaved the center of the hide. Because the hair pattern is straight down the back from the neck to the tail, I shaved the center from top to bottom. Throughout the shaving, I found that I had to watch for bumps and blemishes on the hide. I was very careful not to catch the razor on these in such a way that would gouge or tear the skin. The sharp corner edge of the razor can easily catch the hide. I have read of others who file the corner edge of the blade smooth before shaving the hide.
I decided to leave a small triangle of goat hair in the neck area. This is for personal reasons and my own sense of aesthetics. The case can be made that any hair left on the drum head will dampen the sound. If this turns out to be a problem I will deal with it later. I was not ready to put the head on the drum, so I left the hide nailed to the plywood. It will take about three hours to stretch the skin on the drum.
After a weekend of drying the hide on the plywood, I used #180, fine grit sandpaper to lightly sand the hide where I had shaved it. This removed remaining hair stubble and evened out slight imperfections, like scars, on the surface of the hide. Some people sand the playing surface of the hide after it is stretched on the drum. I preferred doing it while the hide was mounted. The solid surface of the plywood provided a stable surface so I could apply uniform pressure using a sanding block.
Once the skin had dried I examined it for flaws. I noticed a small pin hole. I place three dots of Super Glue on the pin hole. It spread out to form a thin circle. I allowed it to dry 24 Hours. The glue will stabilize the edges of the hole and stop or reduce the expansion of the hole. After the head is stretched I will repair the hole further if needed.
I waxed the bearing edge with a piece of bee's wax. This keeps the wet skin from gluing itself to the wood as it dries.
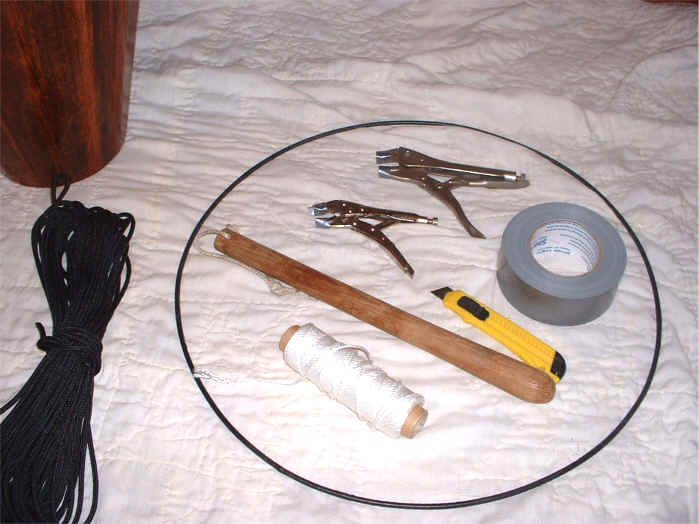
The next day I soaked the skin again for four hours. Some builders recommend soaking a skin for up to 24 hours. During this time I prepared a work area: I placed an old blanket on the floor. I measured the rope I would need for the verticals and gathered the tools I needed:
- small diameter string or cord - to hold the skin in place on the flesh ring temporarily
a knife- to cut the rope
at least two Vise Grips - to hold the rope in place after a section is pulled tight
a wooden handle - to provide a purchase on the rope
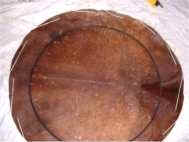
I wrapped some duct tape around the teeth of the Vise Grips so the rope would not be damaged in the teeth of the grip. After four hours, I got the skin out of the tub and placed it on the floor with the flesh ring on top of the skin. I kept the playing-side facing up. Then I used the knife to cut a series of holes around the perimeter of the hide. I loosely strung a cord in and out of the holes.
I tightened the string to hold the goat skin in place against the flesh ring. I placed this on top of the drum..
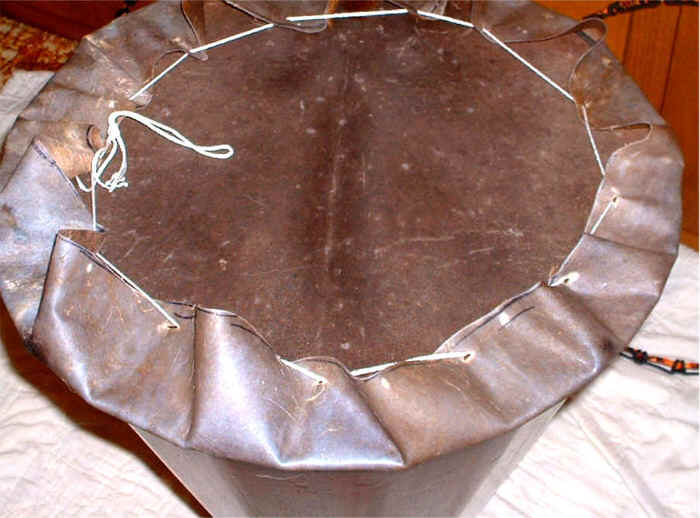
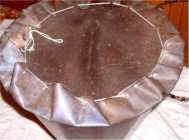
Then I placed the crown ring on top of the flesh ring wrapped in goat skin. Once the crown ring was in place I began to work out the folds in the skin. I made certain there were no folds between the crown ring and the flesh ring. I used some of the cord to also attach temporary verticals to hold the base ring in place. I placed the loops of the crown ring facing down, and the loops of the base ring facing up. I also lined up the extra rope ends of the crown and base rings, so these were directly in line with each other.
I found that the goat skin was drying out too fast because of the low humidity in the room. To keep the skin moist and pliable, I placed a plastic garbage bag on top of the skin.
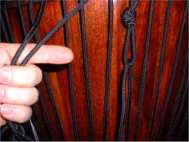
The next step was to lace the vertical rope pattern. I started this step by making a loop in the end of the rope I used for the verticals. Using the other end of the rope, I ran the rope up and down through the crown and base loops. I started at the crown ring, slipped the end of the rope over a knot and down the next loop. I took the rope in a straight line to the base ring. There I ran the end through a bottom loop over the knot and up the next loop. Next I returned to a knot directly above on the crown ring. I worked in this manner, from left to right all the way around the drum. It required over an hour to do this.
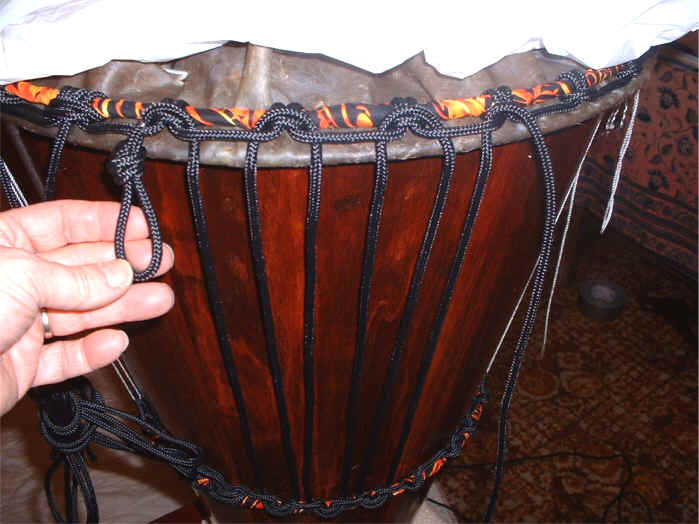
I pulled the rope snug as I went along, but at this point none of the vertical ropes were very tight. The next picture shows the how the last vertical comes up from the last base ring loop. I pulled it through the loop I made at the beginning.
In the picture above I am holding the rope ends of the crown ring in my left hand. After the verticals were tightened, I used these to make the handle. But first, all the verticals had to be made as tight as possible.
To do this I clamped the rope in the final loop with a Vise Grip. Then following the same pattern I used when I ran the verticals, I pulled the rope as tight as I could. I worked my way around the drum from left to right. I worked all the extra rope toward the loop pictured above. Then I loosened the grip pliers and pulled the excess rope through this final loop and refastened the Vise Grip. I repeated this five times. Sometimes I used a wooden handle as a lever to tighten the verticals by inserting the handle between the vertical ropes and then I turned it round and round, like a tourniquet. This was the way I drew up slack and tightened a particularly difficult section. When I was finished, I tied a knot in the last vertical at the loop.
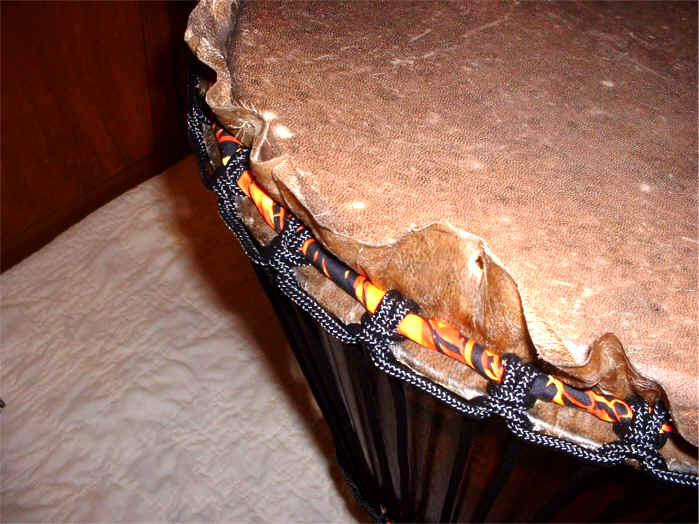
Once the crown ring began to tighten the skin on the head of the drum, I loosened the string that held the skin on the flesh ring. In the picture above you can see how the edges of the skin began to stand up. The picture shows that the flesh ring is a little larger than the crown ring. It also shows how the verticals attached to the crown ring are pulling the head assembly below the level of the bearing edge. This is the result of pulling the verticals tighter and tighter with each go-round. The skin was still very damp at this point.
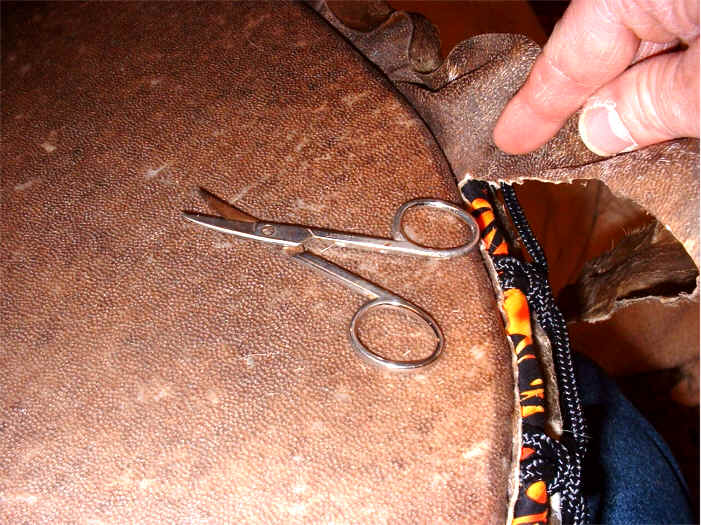
After the I had pulled the verticals as tight as I could by hand, I took a small pair of scissors with curved blades and began to cut the excess skin of the head while it was still damp. The curved blades help me avoid nicking the skin on the drum head.
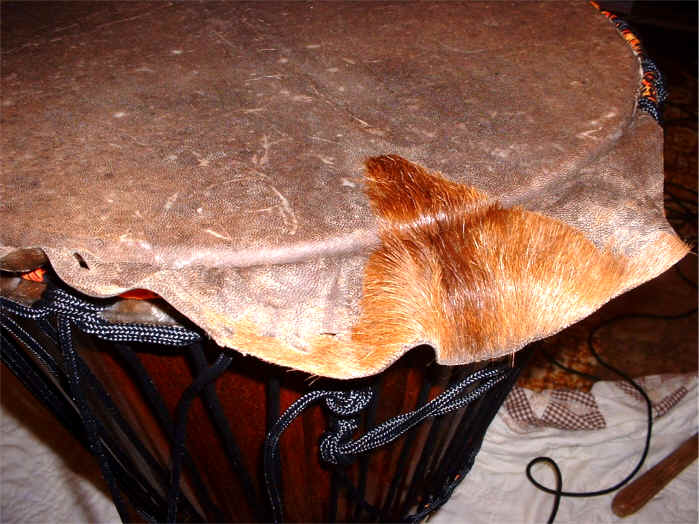
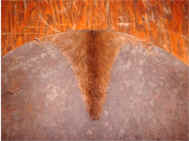
Here you can see the patch of hair I left on the skin. I wanted to keep a small patch of hair to show a bit of the animal the skin came from. Using the small scissors, I continued around the drum and cut the extra hide and hair away. You can see this goat's skin was scarred from bites and injuries.
By now the drum head was beginning to have some tension in it. Although it is not yet tuned, a slight tap of the head resembled a drum sound. I was careful not to play the drum head at this point. I set the drum aside to dry for two days.
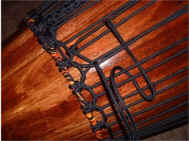
During this time I made the drum handle. I took the extra rope from the base ring and ran it up and over a loop directly above on the crown ring. Then using the extra rope from the crown ring I tied alternating half knots around the rope from the base ring. This was just a basic macramé knot. The handle was a series of these knots I tied working from top to bottom. Some drums do not have a handle. I included one on this drum because it is a large ashiko. The handle provides a reliable way to carry the drum without tugging on the tuning ropes, or handling the drum head.
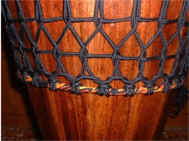
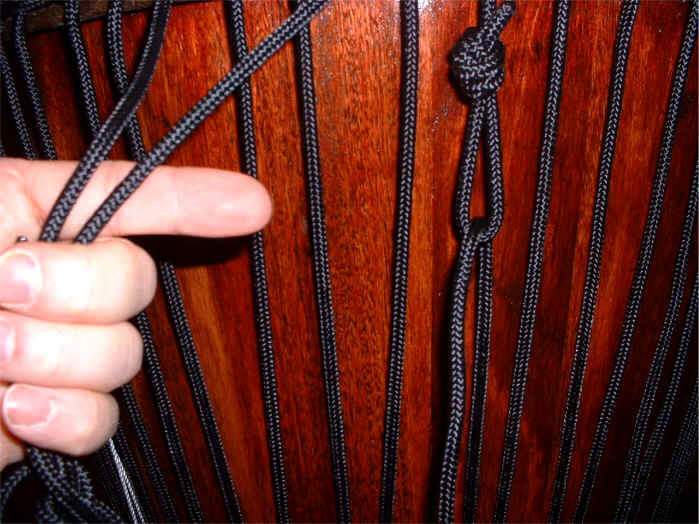
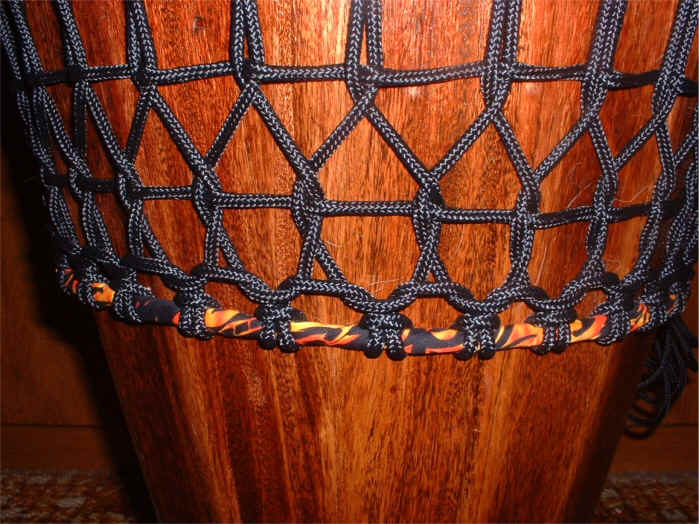
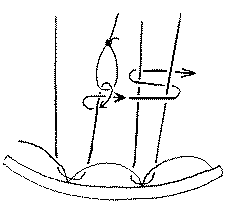
Following direction I found on the internet, I started the Mali weave to tune the drum. I took the vertical that I had tied of at the last loop and tied a hitch on the crown ring. Then I began the Mali weave pattern: pass the rope under a pair, return over top of the last one, dive under the first, then pull tight. The photo below shows the first triangle has been pulled and the rope has been woven through the next pair of verticals and the rope is ready to be pulled for the second triangle. I worked from left to right around the drum.
I pulled two rows of triangles using the Mali weave pattern. This gave the drum a very defined base that sounds like a deep rumbling growl. The drum also produced nice middle and upper tomes. I even discovered a clear half tone beyond the upper tone depending on where and how the head was played.
What did it cost? I built this drum for less than $100. My costs were the rope, the hide, the cloth and the steel rings. I don't think a drum this size could be purchased for less that $250. I worked on this enjoyable project in my spare time, on and off, for 6 months.
Why did I make a hand drum? Part of the reason was to see if I could. The other reason was that a group of men in our church are interested in forming a Psalm Drummers group. I hope to be able to play this ashiko as part of that group.
Common Sense Disclaimer: Risks for bodily injury are always present when using power tools. Follow all manufacturer's recommendations for safe use of power equipment. Personal injury can occur if safety guards are removed from power equipment. Protect your eyes and ears, keep your fingers six inches away from power blades and moving bits. Fingers are the most valuable tools you will ever have. You know the drill. I know I can't hammer it into you, so I won't grind on about it. Don't screw around with personal safety. If you do, you'll get nailed.
My Folding Boat - The Barquito
Flesh Ring Verticals Pulling Diamonds Tight enough?
This guide is not intended
as an exhaustive study of the practice of roping hand drums. Neither is it
intended as a complete discussion of materials, which is the province of the
drum builder. This is only intended for the drummer who wishes to re-skin his
drum or tighten the knots, or replace the roping. There are many different
styles of roping which can be used, some of them complex and ornamental, and
some which only differ in such minor details as which direction to pull the
diamond knots clockwise or counterclockwise. I will only discuss here the
simplest method I know. There is no standard technique and none which can claim
exclusive authority in tradition. The methods described here are the result of
observation of and instruction from African drummers in setting up djembes,
dunun, ashikos, and bougarabou as well as my own imitation and experimentation
with the very many drums I have imported from
The uppermost steel ring is
termed the Crown Ring. This ring is often wrapped in colorful fabric and has the
many knots and loops hanging down towards the bottom of the drum.
The steel ring that has the
hide wrapped around it and upon which the Crown Ring rests is termed the Flesh
Ring.
The bottom steel ring, or
heavy twisted wire, which is often wrapped in colorful fabric and has the many
knots and loops pointing up to the top of the drum is termed the Base Ring.
The rope that passes up and
down through the loops between the Crown Ring and the Base Ring is the Vertical.
The extension of the
vertical (which is occasionally a second rope) that is used to form the diamond
knots is termed the Tail.
Heavy scissors, leather
shears, and/or a razor knife.
A stout stick, a hammer's
handle will do.
Locking pliers - Vise Grips®,
two small pairs are ideal but you can get away with one.
Double edged safety razor
blades, or a cheap electric hair clipper.
Sandpaper, 80 grit and 150
grit.
Matches, or a cigarette
lighter.
The best line to use is
3/16 - 5/32 (4mm) Dacron (polyester) double braided line. It has practically no
stretch and does not react to sunlight, heat, or humidity. Larger diameters are
useful on larger drums, like a dunun, but are perhaps unattractive on
djembes, etc. This can be hard to find. Do not use polypropylene line. It
degrades quickly under sunlight and becomes quite brittle. Twisted or braided
nylon will do, but be aware that it will initially stretch 15% under tension and
will also react to temperature and humidity. If you want to experiment with
cotton, sisal, hemp, or other natural fibers understand that they do not last
very long under this application.
Using a skin or hide which
is fully haired is, in my opinion, the best way to go. Skins that have been
commercially de-haired have been soaked in a chemical bath which not only
loosens the hair but also leeches out most of the oils from the skin. This
shortens the useful life of a skin as a drumhead. If you want the drum head to
be completely free of hair then soak the skin and remove the hair as the first
step of this entire process. If you want to leave a flap of haired skin hanging
around the edge of the drum then remove the hair from the playing area of the
head wile it is still wet but after it has been installed on the rings and the
verticals have been tightened as described below.
There are three good
methods. Shaving, shearing, and depilatories. 1) To shave a skin soak it
in water for a couple hours and then nail or staple it to an appropriate board
with the tail pointed down. Using a double edged razor blade held between the
thumb and the first two fingers begin shaving the skin while the skin is still
wet with strokes directed towards the tail. The blade should be slightly bent by
the thumb. Make sure the skin is stretched flat so you don't nick the skin.
Alternatively, the head can be shaved after it is installed on the drum and
still wet if you want to keep a haired border hanging from the edge of the drum.
Shaving is dangerous the first few times you try it, it is very easy to cut
through the skin and ruin it until you get the feel for it. 2) To shear a
skin soak it in water and hang it as with the shaving. Use a set of electric
hair clippers or a beard trimmer and remove the desired hair. Once the head is
installed and thoroughly dry remove the remaining stubble with 80-100 grit
sandpaper. Don't press it into the head too hard or you'll scar it.
3) To use depilatories follow the instructions on the bottle generously. Squirt
it on, let it set, and pull the hair loose. Use sand paper to remove what
remains. I don't like to use depilatories or any other chemicals on the head.
Wrap the rings with fabric.
This is nice and decorative but it also keeps moisture off the rings so that
rust won't stain the skin. Cut a length of rope to four times the outer
circumference of the ring. This will turn out a little too long, but never mind
that
much better than too short. Melt the ends of the line to keep the weave
from unraveling. With moistened fingers twist the melted ends to a dull point,
do not leave them as a melted ball.
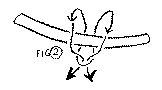
Make a bight in one end of
the line. A bight is an open loop of line, like a fishhook. Put this bight
inside the ring and then thread the free ends over the top of the ring and
through the protruding loop of the bight below. This creates a double
half-hitch. Make sure that the short end is about six inches long, hanging to
the left. Keep these hitches snug, but not real tight, you will want to adjust
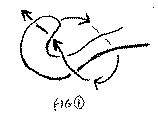
them after you tie them all the way around the ring. See figure below.
Note: I move from left to
right (counter-clockwise looking down at the drumhead) in all my roping. It
really doesnt matter which way you go, but if you also go left to right these
instructions will be more clear. Also, these instructions are for the crown
ring. The base ring, being trapped in place on the neck of the drum and upside
down from the crown ring, needs to have these knots tied while holding the drum
upside down.
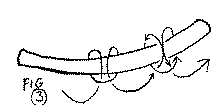
Next, take the long free
end and pass it back over the top to the inside of the ring. You are about to
make the second double half-hitch on the ring, leaving a loop between the first
and the second. Make this loop two fingers widths wide, tight. Put your fingers
right in there, and, pulling it tight, bring the long free end back under the
ring and over your two fingers. This results in a single half-hitch.
Note: Do not make the crown
ring loops two fingers wide. You wont be able to make enough knots to equal
the base ring knots. On djembes, just make the knots far enough apart so you can see
where the loops should be. The loops will create themselves under tension.
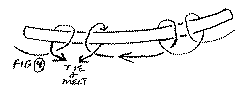
Send the long end (to the
right!) back over this half-hitch and under the ring to bring it over the top
and thread it down through the little loop you just made and voila! The second
double half-hitch is done. See figure below. dont worry, youll be doing
this much faster by the time you are done.
Note: It is desirable to
have an even number of knots on the crown and base rings. This allows for you to
either reverse the direction of your pulled diamonds later on or continue in a
spiral with them without skipping a vertical. You will see what I mean later on,
keep an even number of knots on the rings, and by all means make the number of
knots on the crown and base rings equal!
Continue on around the ring
(to the right!) making double half-hitches and two-finger loops until you reach
the first knot again. Now check to make sure you have an even number of knots
and a loop distance from the last knot to the first that is equivalent to the
rest. If not, loosen or tighten all the knots until they sort out evenly with an
even number of knots. Your precision at this point in making all the loops an
even length of line and all the hitches equally tight will determine in the end
if your roping job looks sharp and professional or sloppy and random.
There are several ways to
tie the remaining two short ends together to create the last loop. It depends on
how short they are. If you left the first one about six inches long then you can
send it over to the left to the last hitch and make one final double half-hitch
using both free ends, tying them off and melting them at the center of the knot.
If this will give you an odd number of knots then you may instead have to send
the free end of the first knot up through the center of the last knot and tie it
off there with the free end of the last knot. Remember to melt them together
after tying them. See figure below.
(If you are not putting on
a new head, but just changing the ropes you can skip this section.)
Place the flesh ring on top
of the selected portion of dry hide you will be using. With leather shears or a
razor knife trim the hide so that there is a 4-inch border of hide outside the
ring. If you are intending to make a haired ruff concealing the crown ring
then let the border be 6 inches or more.
Soak the skin in
water for several hours prior to starting. 24 hours is preferable, and for
cowhide on bougarabous at least 24 hours is necessary.
Remove the hide from its soak and lay it down topside up. Place the flesh ring on top of the hide, nicely centered. Take the crown ring and begin to gently tuck the hide up around the flesh ring and under the crown ring until all the border of the hide is lying between the two rings. Make an effort to keep things centered, and try to avoid getting folds in the hide. If you must have a fold or two just be sure that they do not lay under the knots of the crown ring, and keep them neat. This can be frustrating, keep at it.
Now take this ring/head
assembly and press it down over the rim of your drum. By doing this you want to
pull enough slack out from between the rings to get the tops of the knots on the
crown ring down just below the rim. Be very careful in dealing with any folds at
this point, a thin spot in wet goatskin can tear here. You may also see loose
waves of slack in the top of the head. Tug at the border to pull these waves
out. You want the head to be as flat and evenly tensioned at this wet, loose
stage as possible.
This can be frustrating,
keep at it. Once everything looks just right, immediately begin to run the
verticals.
Caution: If you are dealing
with a new, wet head then this entire procedure needs to be done at one time. If
you have never tried it before then you should allow 3 hours or so to finish. If
you are re-installing the old head then it still needs to be soaked in water for
a few hours in its ring assembly to ensure that it conforms to any
irregularities in the rim and to seat properly. So you should allow a few hours
for this next step too. You will need two small pairs of Vise Grips® (or other
quick release clamp) and a stout stick, like a hammer handle.
How many knots do you have
in the crown ring? Multiply this by 2 and add 20 to get the length of rope, in
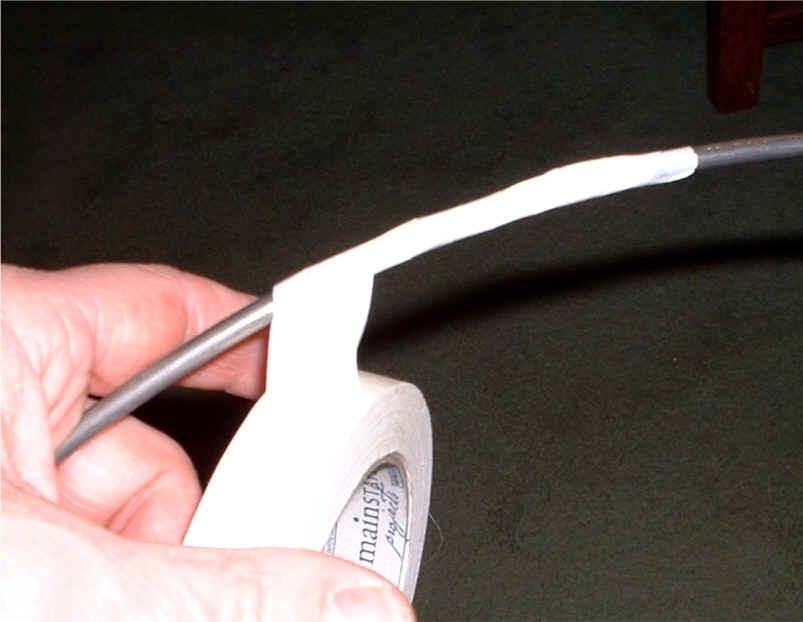
feet, that you will need. Melt the rope ends so they wont unravel and with
moistened fingers form the still red-hot molten ends into dull points.
From this point on you will
have to move gently through these actions. If you tip the head off from its
precarious position then you will have to start all over with centering the hide
on the flesh ring etc. Feed the line through the loops with one hand while
gently pulling on the free end. No tugging!
Send one loose end down
from the outside through a loop in the crown ring. Gently pull it down halfway
to the base ring. Tie a 2-inch loop in this end. This needs to be a strong knot.
Use a surgeon's end loop. Although this may sound dastardly, it is simple:
Take the free end and make a loop about 4 inches long. Hold the tip and the long end side in one hand. Take the end of the loop in the other hand and tie these doubled strands that you are holding in both hands at once in a simple overhand knot, the most basic of knots. Adjust it down to being about 2 inches long. It should now be right up next to the loop it came down from. You will trim the loose end later. See figure below.
Now take the very long free
end and run it down from the outside through the loop in the crown ring on the
right side of the knot that your looped end is dangling down from. Run this long
free end under and through a loop in the base ring, bring it around the knot (to
the right!) and up under the loop on the other side of the knot. Run it up under
the loop in the crown ring that it came down from, pass it out around the knot
and back down over and behind the next loop to the right. Continue this regimen
until you want to scream. Keep all these vertical lines pretty slack, do not
snug them up before they are all in place or else the head will turn out tilted,
out of square with the rim, and the base ring will be pulled all off center too.
When you bring the line up
from the final loop in the base ring it will have nowhere to go but through your
surgeons end loop. Go ahead and pass it through there. Now begin to snug up the
verticals a little at a time all the way around, keeping an eye on the Base Ring
so it doesnt get pulled off center. One way to keep the base ring square with
the drum is to use a small nail or two below the ring to keep it snug with the
bowl in the position you want it. A less intrusive way is to use tape. Keep the
end loop up near the crown ring and snug the rope to the right! Once all the
slack is pulled through the end loop the still wet head will now begin to make a
drum-like sound and you are ready to begin stretching it.
Grasp the free end near the
end loop and pull it down firmly. The loop will act like a pulley and the first
few verticals will tighten up. Take the ViseGrips® and pinch off the free end
with its upward rising vertical just under the loop. This will lock it so you
dont regain the slack you just got rid of. Now pull on the verticals, keeping
an eye on that base Ring, to the right of the loop all the way around to get out
more slack. Take the second pair of Vise Grips® and pinch off the loops
vertical at the crown ring so it will be locked in place. Now remove the first
pair of ViseGrips® and pull on the free end initiating the loops pulley
action again, then reattach the grips. Continue in this manner two or three
times around the drum, until you cant pull any more slack on the verticals
with your bare hand. Use one of the grips to lock off each vertical as you pull
the slack out of it. Finally, wrap the stout stick up in the free end just below
the loop for a heavy pull to get the last bit of slack that you can, reattach
the grips, and
Take a break! You should by now be able to see that the crown
ring has visibly moved down the shell from the rim and the hide has been
stretched. If not, continue. After that break, it's time to remove the
hair, if you haven't done so already.
Let the head dry in this
condition, without working on it more, for a week. Dont push it, and dont
jump the gun. Let it dry for a week. Then you can start pulling diamonds with
the tail. Once it has dried for a day or two you can trim the border off
(carefully) nice and tight to the crown knots, or you can form it into a muff or
collar. To form the muff I take a few feet of rags tied together and wrap it
around the Crown Ring. Then pull the border down over this roll and cinch it off
with a length of line. When everything is dry you can take the line off and trim
the border clean along the lines indentation. Remember that wet rawhide will
conform to whatever shape it is molded to when dry. After everything is good and
dry you can sand off the remaining stubble of hair from shaving/clipping.
Now that everything has
dried for a week go around the drum one or two more times pulling the verticals
and taking out whatever slack there may me. Whatever capacity the rope you used
might have for stretching will now have expressed itself.
Ideally the end loop will
now be down close to the base ring.
 If not, you can run the final vertical back on itself from the loop to an inch
above the base ring and tie it off with a single half hitch so that the free end
is heading to the right. Take this free end and pass it over the first two
verticals descending from the crown. Bring it back towards the loop under that
second vertical, and bring it back over the first one. Now send it to the right
under both of them. This is the weave for the self-locking style of tying the
Mali weave. Pull hard so that the knot snaps into place. You may not need to for
the first few, but soon you will need to get out the stout stick and wrap the
free end around it, put both feet against the drum and heave with your back to
snap the knot into place. When you have pulled each knot, remember to pull the
free end down hard toward the base ring to snug the knot as tight as it will go.
This will make a nice neat straight line and even diamonds as you go around.
If not, you can run the final vertical back on itself from the loop to an inch
above the base ring and tie it off with a single half hitch so that the free end
is heading to the right. Take this free end and pass it over the first two
verticals descending from the crown. Bring it back towards the loop under that
second vertical, and bring it back over the first one. Now send it to the right
under both of them. This is the weave for the self-locking style of tying the
Mali weave. Pull hard so that the knot snaps into place. You may not need to for
the first few, but soon you will need to get out the stout stick and wrap the
free end around it, put both feet against the drum and heave with your back to
snap the knot into place. When you have pulled each knot, remember to pull the
free end down hard toward the base ring to snug the knot as tight as it will go.
This will make a nice neat straight line and even diamonds as you go around.
Note: The wet hide, now
dry, may have glued itself to the rim of the drum while drying. You may want to
rap on the corresponding knot on the crown ring with each diamond you pull to
ensure the hide is free. Be very paranoid about doing this. Use a rubber hammer
or a block of wood under a hammer and pad the rim above the crown knot well
before striking anywhere near it with any tool. One little slip and you can tear
the hide and ruin your work, requiring you to start all over from scratch.
Once you have made your way
all around the drum and completed your first row of diamonds (actually just
triangles so far) you have a choice to make. Either continue around to the right
spiraling the second row above the first, or turning around and laying the
second row in to the left above the first. I am uncertain if either way is
better for the drums performance, but turning around to the left has a better
look. There is room for a lot of discussion on this. Spiraling to the right is
easier, it is more typically African, and it tightens the head more uniformly as
you go around. Turning back to the left tightens the head more quickly, looks
better, and takes fewer diamonds to get things sounding right.
To turn back to the left
simply pass the free end over the end loop vertical to the next vertical, bring
it around that vertical and send it to the left back over the end loop vertical
and the next vertical to the left. then bring it under that one, going to the
right, and over the end loop vertical and then go under again and bring it to
the left under both. The Mali weave to the left like this is no different from
going to the right.
For bougarabou and other
drums using cow hide, tighten the head initially tighter than you want it. Once
the head breaks in you can adjust it to whatever tonal properties are pleasing
to you.
For djembes and other goat
skinned drums, keep on pulling diamonds until you physically cant pull any
more. Play the drum hard for a week or two to break in the head. At some point
the head will go down and be suddenly pitched much lower than it was. Now
pull a couple more diamonds and it should be good.
At this point you can try
to tune the head to the acoustics of the shell if you have a djembe. To do this
you have to have a very good ear. Lay the drum sideways on your lap and knock on
the bowl of the shell with your knuckles and then knock on the stem, or
leg. The tonal interval between these two knockings should be the same as
the interval between the drums bass tone and its slap tone. We are only talking
about intervals here, not matching the tonal centers. Whether or not this works
well for you depends on how the drum was carved, what the internal volumes of
the two chambers are, but this is now clearly moving into the drum carvers craft
and is not in the purview of this article. Try the knocking on the drum thing
and see if it makes sense to your ear.
Otherwise, a djembe or
ashiko, like any drum, can be over tightened. Too tight and the slap tone sounds
great, but the bass begins to suffer. A little too loose and the bass tone
throbs but the slap becomes ill defined. A happy medium is usually the best way
to go. This is when the open tone has the best sound, a nice round open pop.
Bear in mind that the bass tone is probably the least important tone, but if you
tune your drum so high that you begin to lose the bass then you have also lost
some of the supporting resonance that makes the other tones sound their best.
Each drum has its own individual best tuning and finding that is part of bonding
with your instrument, becoming intimately aware that it is at its best, so that
you may be at your own best.
Happy Drumming!
Source: This article
has been written as a public service from Bongo Central. You may reuse it or
reprint it as much as you want if it is reprinted in its entirety including this
notice. We welcome any suggestions which you feel would make this document better.
Copyright 1997 R. Fulbright www.bongocentral.com
http://hawkdancing.com/Wooddrum/drumhead.html
The following ways to care for a goat skin drum apply to all hand drums, such as a djembe, or an ashiko, etc.
Play
your drum with your hands - no sticks or mallets. This will ensure optimal head
life. There is a secondary benefit to using your hands; the oils from your hands
will replenish the oils in the head. So, play often. If you don't play often,
i.e. weekly, put a drop or two of base massage oil on your hand and rub it in
before playing. Olive oil and shea butter are also acceptable oils, but massage
oils feel and smell nicer. Remember, very little is needed. Don't use hand
creams before playing your drum.
Use
a padded drum bag. Well crafted bags can be purchased for as little as $20.00
for a small drum. The bag helps
protect the drum from physical damage as well as from changes in the environment
like humidity and temperature. A bag
with an ample amount of padding acts as insulation. When moving the drum between
extreme temperatures unzip the drum bag a little and leave the drum in the bag
until the drum comes to room temperature. The point is to slow down the rate at
which your drum acclimates to the new temperature.
Don't
use cleaners to clean your goat skin drum head; just play it.
Be
mindful when moving your drum. Be careful not to bang your drum head on a
door frame, table and counter top edges. Sharp edges will easily cut the skin
and damage to the bearing edge. A smooth, even bearing edge is important to
obtain an open tone. If this edge is damaged, a new edge must be put on the
drum, usually along with a new head.
Don't
expose a goat skin drum head to the rain or water. The head will turn to a soft
rag like condition and the drum will lose all its tension. If this happens,
don't play the drum in this condition. You may unseat the head from the rings.
Let the drum head dry naturally. Don't use hair dryers, heat guns or fans. Let
the goat skin to dry evenly.
Depending
on the finish of your drum, there are two methods of cleaning the exterior wood
shell. If your drum has a varnish or lacquer finish, there is little care
required. In this case you can simply use a spray furniture wax and a soft
cloth. Avoid getting wax on the lacing and drum head. For unfinished or natural
wood drums, a light coat of teak oil every few months will help prevent
cracking. Remember, wood moves, and sometimes cracking is unavoidable.
For all solid wood drums, you want to replenish the oils in the wood to help prevent the drum from splitting. Teak oil works well but you can also use linseed oil. Apply to the interior of the drum if it is unfinished. Placing a few tablespoons of oil on a fist sized ball of cloth. Rub the cloth on the interior of the drum being careful not to get oil on the drum head. A light rub down every 4-6 months is sufficient.
Source: www.wwdrums.com/djembe-care-maintenance-a-11.html